Layout
Adds a front view to present the data.
Table of Contents
The way in which the application treats layout files is similar to how it handles extension files. Since your web site will only utilize one layout, it’s important to manually rename any index.php files in unused layout folders to a different name (such as .index.php) to prevent them from loading. However, if you want to load them for any reason (such as creating a child layout to load alongside the parent layout), then renaming them is not necessary.
To simplify your routine, it’s recommended to remove all unused layout folders and keep only the one you use in the .\lot\y folder. Most people don’t frequently change the appearance of their web site, so this approach can make managing your web site easier.
Structure
The standard file and folder structure of a layout is determined by the default layout system for this application, which is the Layout extension. The way in which layout files are processed is completely dependent on this extension, with the exception of files that are treated in the same way as extension files. If you plan on using a different layout system, you may encounter a slightly different standard file and folder structure.
Each layout is stored as a folder within the .\lot\y directory, with a distinct name:
.\
└── lot\
    └── y\
        ├── layout-1\
        ├── layout-2\
        ├── layout-3\
        └── …
The following files are typically included in a standard layout:
.\lot\y\layout-1\
├── engine\
│   ├── kernel\
│   │   └── layout-1.php
│   └── plug\
│       └── layout-1.php
├── .gitattributes
├── .gitignore
├── .htaccess
├── LICENSE
├── README.md
├── about.page
├── composer.json
├── enter.php
├── exit.php
├── index.css
├── index.js
├── index.php
├── index.png
├── package.json
├── page.php
├── pages.php
├── state.php
└── task.php
Alternatively, if you prefer a minimalist approach, you can create a layout that consists solely of the index.php, page.php, and pages.php files, as demonstrated in this example:
.\lot\y\layout-1\
├── index.php
├── page.php
└── pages.php
Files
.gitattributes
You can add this file to specify which files or folders should be excluded from the archive content when downloading a repository for production. Typically, this file contains a list of commands, such as the following example, which excludes the .gitignore, README.md, and the .gitattributes file itself:
.gitattributes export-ignore
.gitignore export-ignore
README.md export-ignore
.gitignore
This Git-specific file excludes certain files/folders from being committed to the repository, preventing accidental inclusion. However, it should be removed in the production version. Certain package files are also excluded, as they should be freshly installed using CLI commands rather than included in the repository for others to clone:
composer.lock
node_modules
package-lock.json
vendor
.htaccess
You can use this file to enable direct access to files with specific extensions within the folder. Keep in mind that for security reasons, all files in the .\lot folder are not directly accessible by default. Here’s an example Apache server command that allows direct access to files with .css, .js, and .png extensions:
<Files ~ '[.](css|js|png)$'>
  Allow from all
</Files>
To improve readability, consider using the <FilesMatch> directive. Use the <Files> directive only to specify exact file names. Keep in mind that this approach can result in lengthy and cumbersome directives:
<Files 'index.css'>
  Allow from all
</Files>

<Files 'index.html'>
  Allow from all
</Files>

<Files 'index.js'>
  Allow from all
</Files>

<FilesMatch '^index\.(a?png|gif|jpe?g)$'>
  Allow from all
</FilesMatch>
LICENSE
Mecha is GPL-3.0 licensed, so include a paragraph in this file that specifies the same license.
README.md
This file isn’t essential to the layout but may be necessary for the repository to appear complete on platforms like GitHub and GitLab. Since it’s ignored in the .gitattributes file, it won’t be included in the archive.
about.page
This file provides information that appears in the control panel’s information page and functions similarly to the README.md file. It’s designed to be read by the official control panel feature:
---
title: Layout Title
description: Layout description.
type: Markdown
author: Your Name
link: 'http://example.com'
version: 1.0.0
...

Layout usage instruction, written with Markdown syntax.
composer.json
Add this file to your layout repository to publish it on Packagist and enable installation via Composer commands. Ensure that the package name follows the correct pattern for our Composer plugin to install it correctly in the layout folder:
{vendor}/y.{folder}Below is an example of a composer.json file for your layout repository, assuming it’s already published on GitHub at https://github.com/your-name/y.your-layout-name:
{
  "description": "Your layout description.",
  "name": "your-name/y.your-layout-name"
}
To make your layout available for installation via Composer, you’ll need to create a stable version release in your repository and publish it on Packagist. You can do this by visiting https://packagist.org/packages/submit and following the instructions. Once your package is successfully published, others can install your layout using the following Composer command:
composer require your-name/y.your-layout-nameYour new layout should be installed in the .\lot\y\your-layout-name location smoothly, and the currently active layout will be automatically deactivated by Composer.
enter.php
While this file is not a standard file, it can be used to store code snippets that can be placed at the top of page.php and pages.php files, so that you don’t have to duplicate the code in both files.
Here is an example of a code snippet that can be stored in this file:
<!DOCTYPE html>
<html class>
  <head>
    <meta charset="utf-8">
    <meta content="width=device-width" name="viewport">
    <?php if ($w = w($page->description ?? $site->description ?? "")): ?>
      <meta content="<?= $w; ?>" name="description">
    <?php endif; ?>
    <meta content="<?= eat($page->author); ?>" name="author">
    <title>
      <?= w($t->reverse); ?>
    </title>
    <link href="<?= eat($url); ?>/favicon.ico" rel="icon">
    <link href="<?= eat($url->current(false, false)); ?>" rel="canonical">
  </head>
  <body>
Later on, this snippet can be loaded into the top of the page.php and pages.php files, thus reducing the amount of code you need to write:
<?= self::enter(); ?>The <html> element in your layout contains an empty class attribute, which may seem unnecessary at first. However, it serves a purpose by allowing extensions to add custom classes to it for specific pages. Without this attribute, custom classes provided by extensions won’t be inserted automatically. You can also add any required classes to the attribute, and extensions will not remove them, ensuring that they remain present on all pages.
<html class="no-js">To insert custom classes automatically, add more states to the [y] state with a truthy value. Keep in mind that this mechanism relies on the internal functionality of the Layout extension. If you use a different layout extension with a different mechanism, adding this state will not have any effect. However, with Layout, you can take advantage of this feature to add custom classes and ensure they are inserted on all pages.
State::set('[y].foo-bar-baz', true);The above state will add a new class to the root element:
<html class="foo-bar-baz no-js">The Layout extension offers automated class insertion that is based on the conditional statement features of the page. This automation is associated with state properties such as are, as, can, has, is, not, of, and with:
State::set('is.art', true);
State::set('is.page', true);
The states above will assign two custom classes to the root element in the key:key format:
<html class="foo-bar-baz is:art is:page no-js">exit.php
This file also has a non-standard name and can be used to store code snippets to be placed at the bottom of page.php and pages.php files. This helps prevent duplicating the code in both files. For instance, you can use this file to store the following code snippet:
  </body>
</html>
Later on, this snippet can be loaded into the bottom of the page.php and pages.php files, thus reducing the amount of code you need to write:
<?= self::exit(); ?>index.css
This is a regular CSS file that is loaded in the layout. While it doesn’t have to be named index.css, I recommend that you use this name as it pairs neatly with index.php. Once you create the file, ensure that it is publicly accessible by including it in the .htaccess file, and load it using the Asset extension in the index.php file.
index.js
If you have an index.css file, chances are you will also need to include this file. The rule for using and loading it is the same as the index.css file.
index.php
This file serves as the main entry point for a layout, and is automatically loaded each time the user accesses the application. You can also use this file to load any other files that you want to include in the layout:
<?php

// Load `index.css` and `index.js` files to the page
if (class_exists('Asset')) {
    Asset::set(__DIR__ . D . 'index.css');
    Asset::set(__DIR__ . D . 'index.js');
}
index.png
You can use this image to give a quick demonstration of how your layout would look like. The actual name of the image is not specific. In order to display this image in the layout information page, you need to manually register it in the image property of the about.page file. I suggest naming the image index.png as it pairs well with index.php:
---
title: Layout Title
description: Layout description.
image: /lot/y/layout-name/index.png
type: Markdown
...

Review the `.htaccess` file specification if the image is not displaying on the layout information page.
Typically, standard image dimensions for layout demonstration purposes have a 4:3 aspect ratio, and can be of any size, though commonly made with a width and height of 1024×768 or 1200×900 pixels. Additionally, you may also use other image extensions such as .gif and .jpg if necessary.

package.json
This file is used exclusively by NPM and does not need to be stored in the layout folder. It is necessary to include this file in order to add build tools for generating the index.css and index.js files from external NPM modules. Since Mecha’s layout is not designed to be published on NPM, you don’t need to provide a package name. This file is used to develop CSS and JavaScript code locally. It will be removed in the production version:
{
  "devDependencies": {
    "@taufik-nurrohman/factory": "*"
  },
  "private": true,
  "scripts": {
    "pack": "pack --clean=false --from=.factory --js-format=iife --to=."
  },
  "type": "module"
}
page.php
This file is exclusively used by the Page extension to display the public face of an item page type. Below is a simple example:
<?= self::enter(); ?>
<main>
  <?php if ($page->exist): ?>
    <article id="page:<?= eat($page->id); ?>">
      <h2>
        <?= $page->title; ?>
      </h2>
      <?= $page->content; ?>
    </article>
  <?php else: ?>
    <p role="status">
      <?= i('%s does not exist.', 'Page'); ?>
    </p>
  <?php endif; ?>
</main>
<?= self::exit(); ?>
pages.php
This file is exclusively used by the Page extension to display the public face of an items page type. Below is a simple example:
<?= self::enter(); ?>
<main>
  <?php if ($page->exist): ?>
    <article id="page:<?= eat($page->id); ?>">
      <h2>
        <?= $page->title; ?>
      </h2>
      <p>
        <?= $page->description; ?>
      </p>
      <?php if ($pages->count): ?>
        <?php foreach ($pages as $page): ?>
          <article id="page:<?= eat($page->id); ?>">
            <h3>
              <?php if ($link = $page->link): ?>
                <a href="<?= eat($link); ?>" rel="nofollow" target="_blank">
                  <?= $page->title; ?>
                </a>
              <?php else: ?>
                <a href="<?= eat($page->url); ?>">
                  <?= $page->title; ?>
                </a>
              <?php endif; ?>
            </h3>
            <p>
              <?= $page->description; ?>
            </p>
          </article>
        <?php endforeach; ?>
        <?php if ($next = $pager->next): ?>
          <a href="<?= eat($next->link); ?>" rel="next">
            <?= i('Next'); ?>
          </a>
        <?php else: ?>
          <a aria-disabled="true" rel="next">
            <?= i('Next'); ?>
          </a>
        <?php endif; ?>
      <?php else: ?>
        <p role="status">
          <?php if ($site->has('part')): ?>
            <?= i('No more %s to show.', 'pages'); ?>
          <?php else: ?>
            <?= i('No %s yet.', 'pages'); ?>
          <?php endif; ?>
        </p>
      <?php endif; ?>
    </article>
  <?php else: ?>
    <p role="status">
      <?= i('%s does not exist.', 'Page'); ?>
    </p>
  <?php endif; ?>
</main>
<?= self::exit(); ?>
state.php
This file should return an array that can be used by the layout itself and other components. The data in the array will be automatically loaded as $state->y->{'layout-name'} object. If this file doesn’t exist, the $state->y->{'layout-name'} object will return an empty array:
<?php

return [];
task.php
This optional file is loaded before the index.php file and allows you to perform specific tasks such as automatic file repair before the layout is loaded. Once all the tasks are completed, you can add a command to delete the file:
<?php

$done = 0;
$content = <<<PAGE
---
title: Example
description: Edit this page.
type: Markdown
...

You can delete or edit this page from the control panel.
PAGE;

if (!is_dir($folder = LOT . D . 'page' . D . 'store')) {
    mkdir($folder, 775, true);
} else {
    if (!is_file($file = $folder . D . 'example.page')) {
        file_put_contents($file, $content);
    } else {
        ++$done;
    }
    ++$done;
}

if (2 === $done) {
    unlink(__FILE__);
}
Folders
engine\
It usually contains two other folders named kernel and plug. Store your application classes in the kernel folder so you don’t have to load them manually. Classes stored in this folder will be loaded automatically as long as you follow the class naming conventions. You can add custom tasks that need to be executed once a class is loaded inside the plug folder. If additional files specific to the classes are available then files with the same name as the class name will be loaded automatically:
.\lot\y\layout-1\
└── engine\
    ├── kernel\
    │   └── layout-1.php
    └── plug\
        ├── anemone.php
        └── layout-1.php
In the above layout file structure, the .\lot\y\layout-1\engine\kernel\layout-1.php file must contain the definition of the Layout1 class. Once you declare the Layout1 class somewhere, this file will be loaded automatically. Additionally, the .\lot\y\layout-1\engine\plug\layout-1.php file will also be loaded since the class has never been loaded before.
The file .\lot\y\layout-1\engine\plug\anemone.php will also be automatically loaded since it shares the same name as the Anemone core class. You can use this file to add custom methods and extend the features of the Anemone class.
index\
This folder can be used to store files related to other extensions, such as the panel.php file, which Panel extension can find and load for use. The name of this folder comes after index.php to make it look neat when paired up, but it is non-standard and not detected by any special feature in the core application. Currently, only Panel extension considers the existence of this folder.
page\
This folder can be used to store item page type layout files that inherit to the page.php file, or to store layout files that are alternatives to the page.php file. For example, you may have several page types that require different layouts such as a product page, a blog post, or a landing page. By utilizing this folder, you can easily manage and customize the layout of each page type to suit your specific needs:
.\lot\y\layout-1\
├── page\
│   ├── audio.php
│   ├── image.php
│   └── video.php
└── page.php
As demonstrated in the example above, you can store files in this folder and designate optional layouts for specific pages by adding a layout property to the page. By doing so, you can easily ensure that certain pages utilize the desired layout file. This feature offers flexibility and ease in managing your page layouts, as you can customize the layout for individual pages without having to modify the page.php file:
---
title: Page Title
description: Page description.
layout: page/audio
type: HTML
...

<audio controls>
  <source src="http://127.0.0.1/lot/asset/audio.wav" type="audio/wav">
  <a href="http://127.0.0.1/lot/asset/audio.wav">Download</a>
</audio>
The name of this folder is non-standard and serves only to assist in organizing your file structure. However, the folder name can trigger the control panel to display an option field. This feature makes it simpler to set a custom layout for your page without the need to directly edit the page file content. With this option field, you can easily select the desired layout from the available options and apply it to the page:
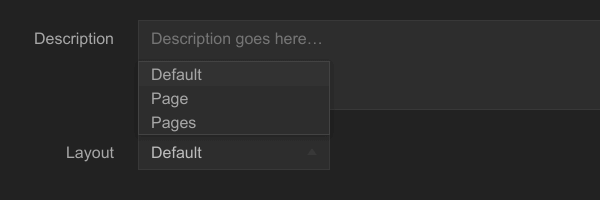
Any additional custom layout files you create will automatically become available in the list for you to select from. It is important to note that the presence of an empty page folder is enough to trigger this field to appear. Therefore, if you wish to use this feature to its fullest potential, it is recommended that you store all of your custom layout files in this folder. By doing so, you can easily manage and customize your page layouts while taking full advantage of the option field feature.
While it is possible to use alternative naming conventions, such as the example shown below, it is important to note that this convention will not automatically trigger the layout field to appear in the control panel:
.\lot\y\layout-1\
├── page.php
├── page-format-audio.php
├── page-format-image.php
└── page-format-video.php
If you choose to use this naming convention, you will need to apply the desired layout to the page file manually, as shown below:
---
title: Page Title
description: Page description.
layout: page-format-audio
type: HTML
...

<audio controls>
  <source src="http://127.0.0.1/lot/asset/audio.wav" type="audio/wav">
  <a href="http://127.0.0.1/lot/asset/audio.wav">Download</a>
</audio>
While this approach offers greater flexibility in naming your layout files, it does require more manual effort in applying the layout to the page file. If you prefer a more automated process, it is recommended that you utilize the standard naming convention and store all of your custom layout files in the designated folder.
pages\
The function of this folder is similar to that of the page folder. However, it is best utilized for organizing layout files that specifically serve to display items page type:
.\lot\y\layout-1\
├── pages\
│   ├── audio.php
│   ├── image.php
│   └── video.php
└── pages.php
state\
The recursive state data for an application can be stored in this folder to improve manageability. By keeping it separate, it becomes easier to load the state data based on specific conditions or requirements. This approach can help simplify the code and make it more organized.
Log
A minimal layout with almost zero dependencies.